In order to run an experiment in a Zantiks unit you need to write a script in Zantiks' proprietary software language, Zanscript. All scripts must then be "built" so that it can be added as a service on the home console page.
This manual will explain where to find key elements from the home console page for running experiments. How to find the Zanscript directory. How to create new scripts, upload scripts from the website and how to edit existing scripts. This manual will also explain how to load Zanscripts into your services directory in order to run experiments, and where to find your assets for running experiments.
Zanscript Directory
The Zanscript link, located at the bottom centre of the Zantiks Control Console page, brings up the Zanscript directory. This page lists all of the zanscripts saved on the unit.
From the Zanscript directory you can:
- Edit existing Zanscripts
- Download Zanscripts (.zs file) to any networked device
- Delete unwanted Zanscripts (NOTE this is irreversible)
- Create a new Zanscript
- Upload a Zanscript (.zs file) from the website, another user or the Zantiks support team.
Video walkthrough of the Zanscript directory page
Create a new Zanscript
When learning to write a Zanscript, it is often easiest to use parts of code from the demo Zanscripts we provide. For instructions on where to find existing codes and how to adapt Zanscripts, go to the Writing and Adapting Zanscripts manual. To create a new Zanscript:
- From the Home Console page, select Zanscript directory.
- From the Zanscript directory page, click Create New.
- Enter a new file name and click Create file (file names are case sensitive and cannot include spaces).
- This brings up the Zanscript Online Development page and a scripting box.
- You can write an entirely new script, or copy and paste elements from other demo Zanscripts.
NB: The script will not autosave as you write. Take care to occasionally save at regular intervals.
Video demonstration for creating a new Zanscript
Create and load a new service
Once a new Zanscript has been created or an existing .zs file has been uploaded into the Zanscript directory it MUST be built. This will convert it into a .zex file which can be found in the Services Directory.
- Once a script is complete click the Build button. This can be found at both the top and bottom of the page. If you have uploaded a pre-written Zanscript (.zs file) you must select Edit and then Build.
- This saves and compiles the script and brings up the Zanscript Compiler page. The compiler page details any errors or warnings found in the script including which line of code the error was found. It also tells you whether the build is successful or not.
- If your Zanscript has an errors or warnings, the Edit/Rebuild link at the bottom of the page will take you back into the script so that you can correct them.
- If the script has built successfully, navigate back to the control console using the Home link at the bottom of the page.
- To upload a new service, select Settings from the control console.
- The 20 numbered slots below the Zanscript shortcuts heading are used to load scripts to the control console. Type the script's name (remember that this is case sensitive) in one of the numbered boxes and click Set.
- The system will bring up a new page indicating a successful or unsuccessful link.
- Select Home to navigate back to the control console page, where the new service will be found under the relevant slot.
INSERT VIDEO FOR BUILDING SCRIPTS, LOADING SERVICES
Video example of how to build a script and load a service
Edit a service
If at any time you want to change any of the elements in the service/experiment:
- From the Control Console select Zanscript directory
- Click on the Edit button for the relevant experimental script
- In the Zanscript Online Development page, make any edits and select Build
- This will update the Zanscript and it will automatically update the service, so that when you next run the experiment it will take into account your changes
Run a Service
To run a service:
- From the Control Console, select the service that you would like to run. The name of the service should appear as the Current service on the top left of the page
- Select Live Video found at the bottom centre of the Control Console page to see a live feed of the test environment. The clock at the bottom of the live feed shows GMT (Greenwich Mean Time). When no service is running, the bottom centre shows the status as *IDLE*.
- Click Run at the bottom right of the live video display page to start the experiment (You can also select Run from the control console page). The system's status will change to *RUNNING* in a pink bar. A time on the live video will change to show the running time of the experiment in seconds.
- To stop the experiment at any time, click the Stop button at the bottom right of the screen. This terminates the experiment. Clicking Run again starts the experiment from the beginning. There is no pause button.
INSERT VIDEO SELECTING & RUNNING A SERVICE
Video demonstration of how to select and run a service
Download a Zanscript
If you want to share a Zanscript with someone you can download the .zs file from the Zanscript directory.
To download a Zanscript as a .zs file right click on the script and select "Save File As" or "Save Link As" (depends on if your are using Windows or MacOS). Left clicking on the script name hyperlink will open a read-only version of the script.
If you require support with your script writing you can download your Zanscript as a .zs file and send them to one of the Zantiks support team. In this case you must save files from the Zanscript directory. This is the only way to save files as a .zs file. Trying to save files from the Services directory will save them as a .zex file which is a file that cannot be read/edited.
Assets directory
Assets are bitmap files used to assign detection arenas for tracking or create visual stimuli on the screen. These files need to be uploaded into the Assets directory (in the 'Administration section' at the bottom of the Control Console page) on the Zantiks unit in order for your script to execute correctly. Assets are automatically loaded into the asset directory when built using one of our asset building scripts.
Building assets
In order to build assets, you will first need to calibrate you system. Detailed instructions on how to do this can be found in the calibrating your Zantiks unit manual
Once you have successfully calibrated your system you can start to build your own assets. Instructions on how to do this plus the necessary script downloads can be found in the following manuals:
Zantiks Live Video Display page
The Live Video Display page gives you a live feed of the experimental chamber. There are some advanced controls which enable you to check that the correct arena or zone assets are loaded in your script. First you need to select the service you want to use on the Home page, navigate to the Live Video page and then click 'Run'. The script will load and then you can check the assets are correct. (N.b. if you click to check the arena and zone assets before running the service, the assets loaded in the last experiment will be shown).
Checking the assets before you run a service is especially important with the MWP unit - you need to ensure that the arenas asset matches the wellplate. If the there seems to be a little misalignment the diffuser stand may need to be pushed to the left and to the back in the recessed area of the chamber, and that the wellplate needs to be pushed similarly in the diffuser stand.
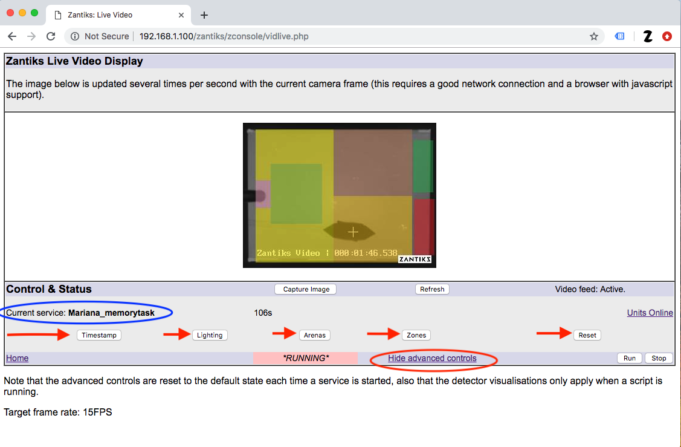
The screenshot above shows the Zantiks Live Video Display page during an experiment.
- The current service is called 'Mariana_memorytask' (ringed in blue oval) and it is 'RUNNING' (see 'RUNNING' is displayed in a pink box).
- The Live video screen shows a live image of the arena - at this point there are zones switched on (see colour blocks) and the unit is tracking a 'fake mouse'.
- The image displayed is small as the camera has been reprogrammed to accommodate a bigger animal, and the camera is taking 15 frames per second (see the line at the bottom of the image 'Target frame rate: 15FPS'. If a smaller animal is being tracked the camera is on its default setting and the live video displays a larger image and the camera takes 30 frames per second.
- The screen is showing the advanced controls - hence the link (ringed in red) says 'Hide advanced controls' - click on this link and you can hide the advanced controls.
- The five advanced controls are marked by the red arrows, if you click on the link boxes you can change the display on both the video recording (if a service is live and programmed to record one), and on the Live video screen accordingly:
- Timestamp: click on this and the timestamp will not display.
- Lighting: click on this and the overlays (i.e. the visualisations of the zones currently programmed) will not appear.
- Arenas: click on this and the arena asset will appear.
- Zones: click on this and the zone asset will appear.
- Reset: click on this and the default settings will display - with timestamp and with overlays appearing when they are programmed to appear.
For descriptions of the Zanscript syntax visit the manual here.
For an explanation on how to navigate the website to find all of the various types of scripting support pages and codes and examples of how to edit existing scripts, visit the Learning how to Zanscript support page here.

