The Zantiks LT unit helps standardise behavioural experiments in larger animal models, such as mice and rats, as well increasing throughput with smaller models, such as zebrafish, Daphnia and adult Drosophila. To use the Zantiks unit you need space on your lab bench, a nearby power supply, and your own browser-enabled device (e.g., smartphone/tablet/ laptop/PC/ Mac).

Zantiks LT kit
- Integrated unit (approx. 870mm H; 560mm D; 410mm W) with:
- Computer
- Camera
- Motor (to drive solid, liquid and gas delivery)
- Overhead 'house lights'
- Screen at the bottom (or top) of the chamber
- Power inputs to enable the addition of more built-in stimuli
- Zanscript (Zantiks software)
- A 12V power cable
- Zantiks router, power cable, and Ethernet cable
- A router is supplied with the first unit, this is typically a TP Link router with 4 LAN ports. The single WAN port is not used in the typical configuration and is taped over to stop it being used by mistake. Subsequent units can be networked to this router, using a network switch if necessary.
Add-on equipment for aquatic animals
This may vary, according to the needs of the user, however typically it will include:
- One large aquatic tank (300mm height; 360mm width, 270 depth) with a clear base and opaque sides. This tank can come with a choice of inserts including:
- Food hopper
- 5 choice insert or 2 choice insert
- Opaque sideways inserts x 2
- Tabs to hold sideways inserts x 5
- Three narrow tanks with inserts:
- Food hopper x 3
- Opaque lengthways inserts x 4
- Tabs to hold inserts (3 sets of 5)
- 3D tracking set:
- 3D narrow tank with clear ends and base, infrared black sides
- Mirror box insert
- Side lighting for mirror
- Brass feeder mechanism for solid food delivery of fish food - attaches to the motor
- Peristaltic pump unit for liquid delivery - attaches to the motor
- We recommend you use the following tubing with it: 2mm internal diameter, 4mm external diameter silicone tubing.
Add-on equipment for rodents
This may vary, according to the initial needs of the new user, however typically it will include:
- One large cage - (300mm height; 360mm width, 270 depth). This cage will come with one set of inserts dependent on the users needs including:
- Food hopper insert & 2-choice insert
- Y-maze insert
- Pellet feeder mechanism for solid food delivery - attaches to the motor
- Peristaltic pump unit for liquid delivery - attaches to the motor
- We recommend you use the following tubing with it: 2mm internal diameter, 4mm external diameter silicone tubing.
Assembling the Zantiks LT
The Zantiks LT unit will arrive flat packed and requires assembly. The video below provides instructions for assembling the Zantiks LT unit.
Assembly instructions for the Zantiks LT unit
Setting up the Zantiks LT
Once the LT unit has been assembled, place the LT unit on a stable surface close to a power socket and away from disturbances. The top box can be set up as shown below.
NOTE: Ensure all wires are connected to the green connection plugs securely. Please see the tutorial video on how to do this.
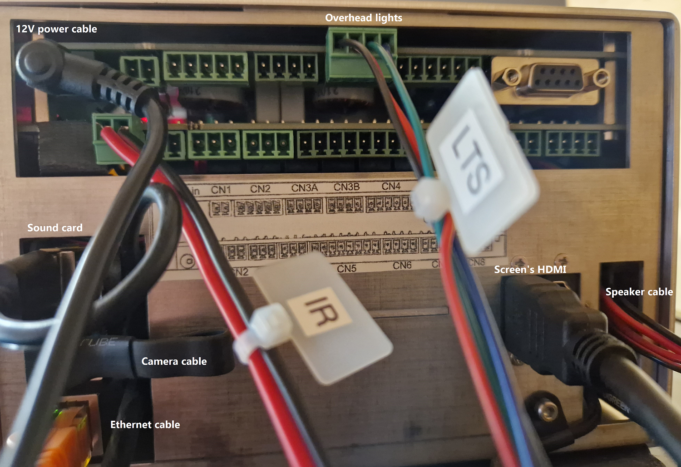
- If the HMDI and power cables were not attached to the screen during assembly, do this step now.
- Connect the screen to the top box via the HDMI cable and plug the screen's power socket into a mains socket.
- Insert the 12V power supply cable into the top box of the LT (located above the ethernet cable) and plug it into the mains socket.
- Plug in the camera cable (the flat USB cable with the blue connector) and the sound card cable (the round cable).
- Connect the ethernet cable to the top box of the Zantiks unit and plug this into any of the 4 slots available in the LAN section of the router.
- NOTE: that the blue WAN socket has been covered. This socket should not be used and has been covered to discourage users from trying to connect using the WAN rather than the 4 LAN sockets. Plug the router into a mains power supply.
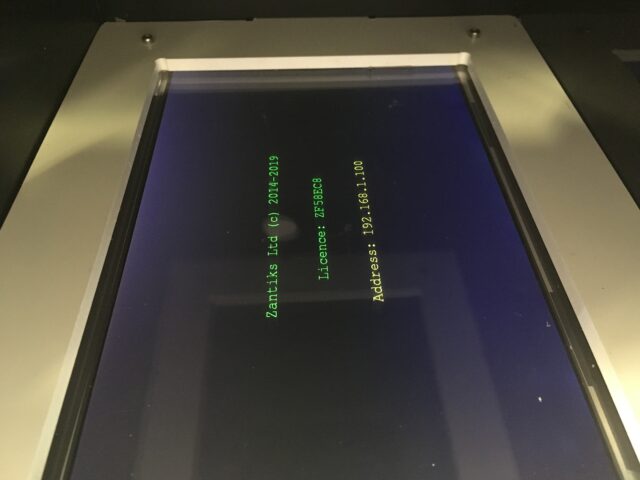
- Turn on the mains power for the router, Zantiks LT unit, and the screen. When the Zantiks unit powers on, a text screen will load and scroll across the screen in the unit.
- The unit’s IP address will display on the screen each time the unit is turned on (It is also available on your delivery note). The IP address is used to identify the unit on the Zantiks Control Console.
- Using any browser-enabled device:
- Go to your device’s network settings and connect to the wifi network "zantiks_XXX" (XXX referring to the name of your network on the delivery note).
- Type in the network password, which is initially set up as: behaviour, simply (this is also available on the delivery note).
- You computer will likely come back with "connected without internet". This is correct since it is just a local network, it does not provide internet access.
- Open a web browser of your choice, go to the address bar and type in the IP address for your Zantiks unit.
- Your web browser should now display the Zantiks Control Console page.

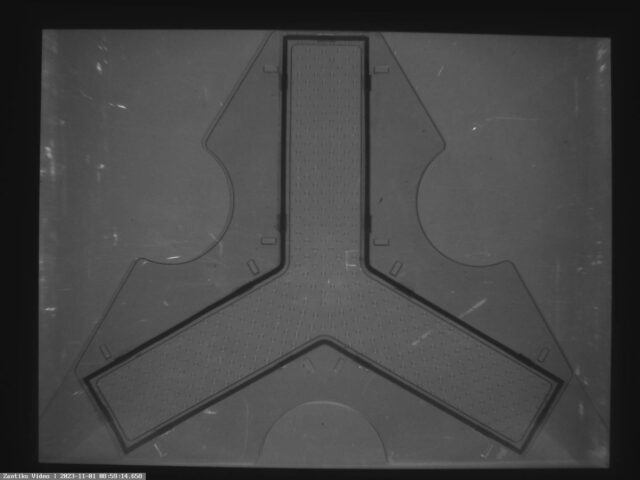
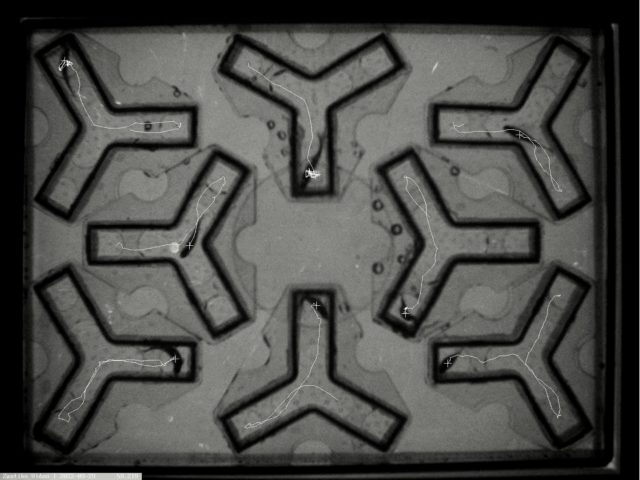
Setting up different Y-mazes in the LT
The Zantiks LT has optional add-ons for conducting Y-maze assays in the Zantiks LT unit. We offer the option for a single mouse Y-maze or up to eight Y-mazes for adult zebrafish or similarly sized animals. The set up of the different types of maze inserts is outlined below.
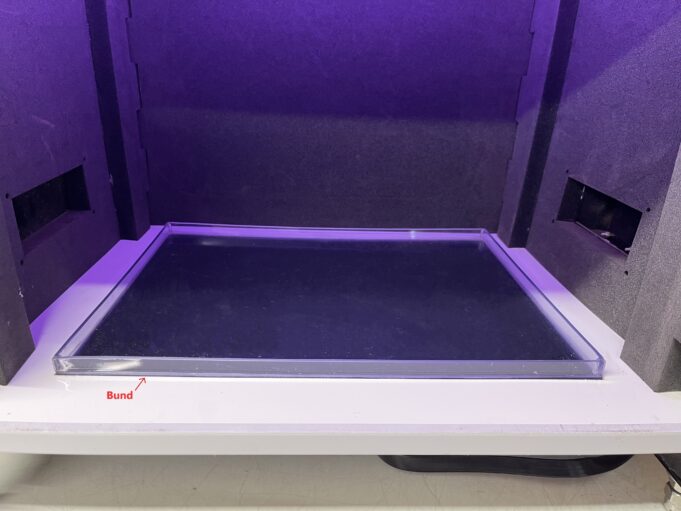
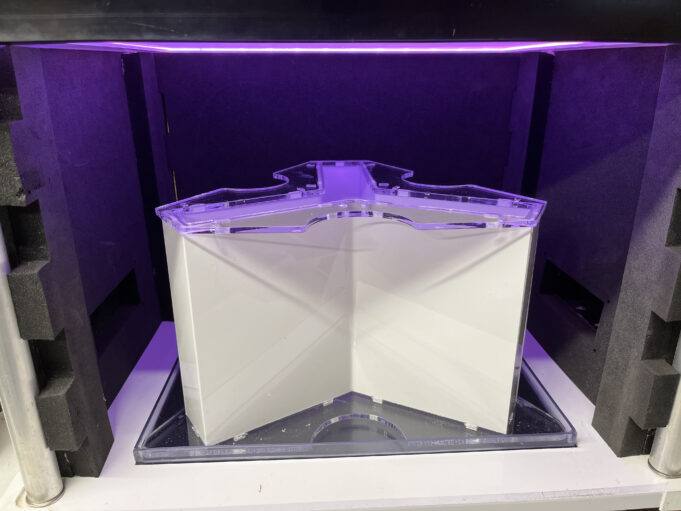
- Place the bund onto the unit's base (i.e., the built in screen). It should fit snugly, but if there is room to move it, push this up and to the left corner. The bund acts as an easily, removable waste tray.
- The Y-maze gets placed on to bund. It can be fitted with two arms facing out and towards the front corners or back corners with the final arm facing either the back wall or front wall.
NOTE: Tracking zones can be created using one of our example scripts on the Asset building in the LT page.
Setting up the multi-tanks Side View Stand
The Zantiks LT has an optional add on for tracking from a side view. The assembly and set up of this system is outlined below.
NOTE: we make multiple variations of the side view stand for different sized tanks/vessels. Contact us if you need help with the dimensions of your side view stand.
Assembling the LT side view stand
Once the side view stand has been assembled, it can be placed within the Zantiks LT unit. The set up of the multiple side stand in the LT unit is outlined in the video below.
Setting up the side stand inside the Zantiks LT unit
Briefly:
- Turn the entire LT onto its side.
- Place the stand into the unit so that the top row of tanks is positioned against the middle layer of the LT and the bottom row of tanks is facing the screen of the bottom layer.
- Place the additional foam rectangles either side of the side stand. This will act as a locator for standard positioning.
- Connect the motor cable from the side socket of the top box to the motor on the multiple side stand.
- Add the tanks/cuvettes/cell culture flasks into the stand.
Setting up the 3D unit in the Zantiks LT
The Zantiks LT has an optional add on for 3D tracking which allows X, Y & Z coordinates to be collected simultaneously without the need for additional cameras. The video below provides instructions for setting up the 3D unit in the Zantiks LT unit.
Setting up the 3D tracking unit
Setting up the Rotating Climbing Wheel Stand
The Zantiks LT has an optional add on for an automated, rotating climbing wheel which allows for climbing assays for Drosophila. The videos below provide instructions for setting up the rotating climbing wheel in the Zantiks LT unit.
Assembling the rotating climbing wheel
Changing climbing assay tube size
Once the rotating climbing wheel has been assembled, it can be placed within the Zantiks LT unit. The set up of the rotating climbing wheel within the LT unit is outlined in the video below.
Setting up the rotating climbing wheel within the Zantiks LT unit
Briefly:
- Remove the front and back foam side panels.
- Shut down and unplug the system.
- Turn the entire Zantiks LT onto its side.
- Place the additional foam rectangles either side of the wheel stand. This will act as a locator for standard positioning and to stop the ingress of light.
- Place the wheel stand into the unit so that it is positioned against the middle layer of the Zantiks LT (rather than at the bottom near the screen). The wheel stand should be lined up with the cut-outs of the foam locators.
- Connect the motor cable extending out of the wheel stand to the matching cable from the top box.
- Plug the system back in.
Continue to the manual Calibrating your Zantiks unit, to calibration your system for asset building.

