This section contains instructions on how to build assets using zanscript in the AD unit.
Building assets for AD tank/cages
Once the calibration is complete, you can download and run the scripts to generate your assets.
1. Download the relevant script below and add this to the Services directory. Instructions on how to upload scripts and add services can be found in Zanscripts & services.
2. Place your tank/cage, with the relevant inserts in place, onto the base screen in your AD unit.
3. Select the service button, go to the live video feed and run the script. You will see the arenas asset, followed by the zone asset, generated on the screen and can check the alignment/positioning of the asset with the inserts in your tank/cage.
4. Once the script has been run, the asset can be found as a .bmp file in the 'Assets Directory'. The name of the .bmp file that is generated can then be written into experiments for tracking using the LOAD(ARENAS,"name_of_asset") and LOAD(ZONES,"name_of_asset") commands.
How to edit arena or zone placement
The dimensions provided within the script will produce the correct number of arenas at the estimated correct positioning. However, you may need to use the following settings to adjust the positioning slightly to match the specifications of your individual camera's placement.
Example Script
###################################################################

DEFINE X_OFFSET 103
DEFINE Y_OFFSET 73

ACTION MAIN

 ShapeType(RECTANGLE,206,146)
 SET(DrawArena,1)
 ShapeDraw(X_OFFSET,Y_OFFSET)

 SaveDrawing("AD_TANK")
 WAIT(3)

COMPLETE
DEFINE X_OFFSET: moves the arenas & zones across the horizontal (x) plane of the image. Increasing this number shifts all arenas & zones to the right and decreasing this number shifts all the arenas & zones to the left.
DEFINE Y_OFFSET: moves the arenas & zones across the vertical (y) plane of the image. Increasing this number shifts all arenas & zones down and decreasing this number shifts all the arenas & zones to the up.
NOTE: These numbers only need to be adjusted minimally to see a difference.
SaveDrawing("name_of_asset"): saves the resulting asset file in the Asset directory under the name written within the inverted commas.
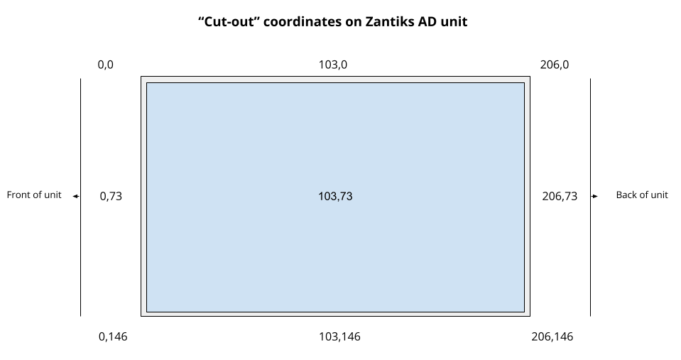
AD screen coordinates (in mm)

The screen's coordinates, in mm, are used in placing arenas and zones in their correct position (e.g., DEFINE X_OFFSET, DEFINE Y_OFFSET, ShapeType). You can determine the arenas/zones desired locations through the use of the dimensions/coordinate layout of the cut-out as illustrated above.
Y maze positioning
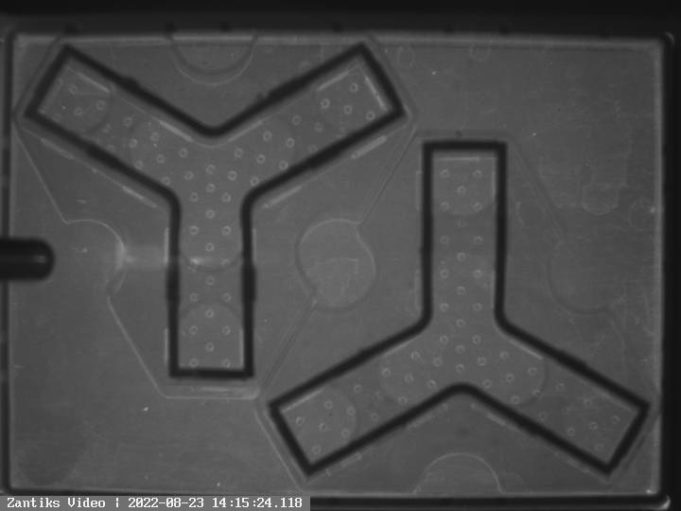
The Ymaze can be place inside the AD tank in two orientations. It is important that you place the maze in the orientation that matches the layout n the asset building script.
Place the Ymaze so that, when in the system, it looks like the image below. To ensure standard positioning, make sure that the flat edge of the Y maze is at the top left and bottom right of the tank and that they are pushed into the corners of the tank.

Script downloads
To download the zanscripts to build assets for a range of tracking arenas and zones as a .zs files (file type Zantiks software reads), choose the Save File As option in the right-click dialogue box. Clicking on the script name hyperlink will open a read-only version of the script.
Script downloads for assets:
Whole AD tank: gADtank.zs
AD tank split in 2 (width): gAD2width.zs
(this asset can be used with the light/dark box inserts as well)
AD tank split into 3 (width): gAD3width.zs
AD tank split into 4 (width): gAD4width.zs
AD tank split in 2 (length): gAD2length.zs
AD tank split in 3 (length): gAD3length.zs
AD tank split in 4 (length): gAD4length.zs
AD tank, zones for 5 choice inserts: gAD5choice.zs
2 x YMaze inserts: g2YMaze_AD.zs
2 x 2YMaze plates: g2x2YMaze_AD.zs
AD 3D mirror biting, arenas & zones: gAD_3D_mirrorbite.zs
Next, go to Zantiks Control Console to see how you operate the unit via your web browser.


