This section contains instructions on how to calibrate your system and build assets using zanscript in the MWP unit.
Calibrating the unit
Before building the assets needed for tracking and data collection, the unit must first be calibrated. Typically, each unit & light stimulation plate will only need to be calibrated once.
Each unit will come with one corresponding light stimulation plate / diffuser stand. It is advisable to re-do the calibration if you will be using a new light stimulation plate in your unit.
1. The MWP unit is supplied with a black 96-well plate labelled "calibration plate". Place this well plate onto the light stimulation plate and push it to the back and to the left for standard positioning.
2. Place the light stimulation plate with the calibration plate into the MWP unit. The four legs of the light stimulation plate should fit snug into each corner of the MWP base. If there is some room for movement push the plate to the back and to the left as with the calibration plate.
3. The MWP unit is preloaded with a script named 'calibration.zs', which will be assigned to one of the service buttons on the Control Console homepage. Select this service button and click RUN to start the calibration.
NOTE: The script will freeze your console screen for a few minutes while it runs the calibration.
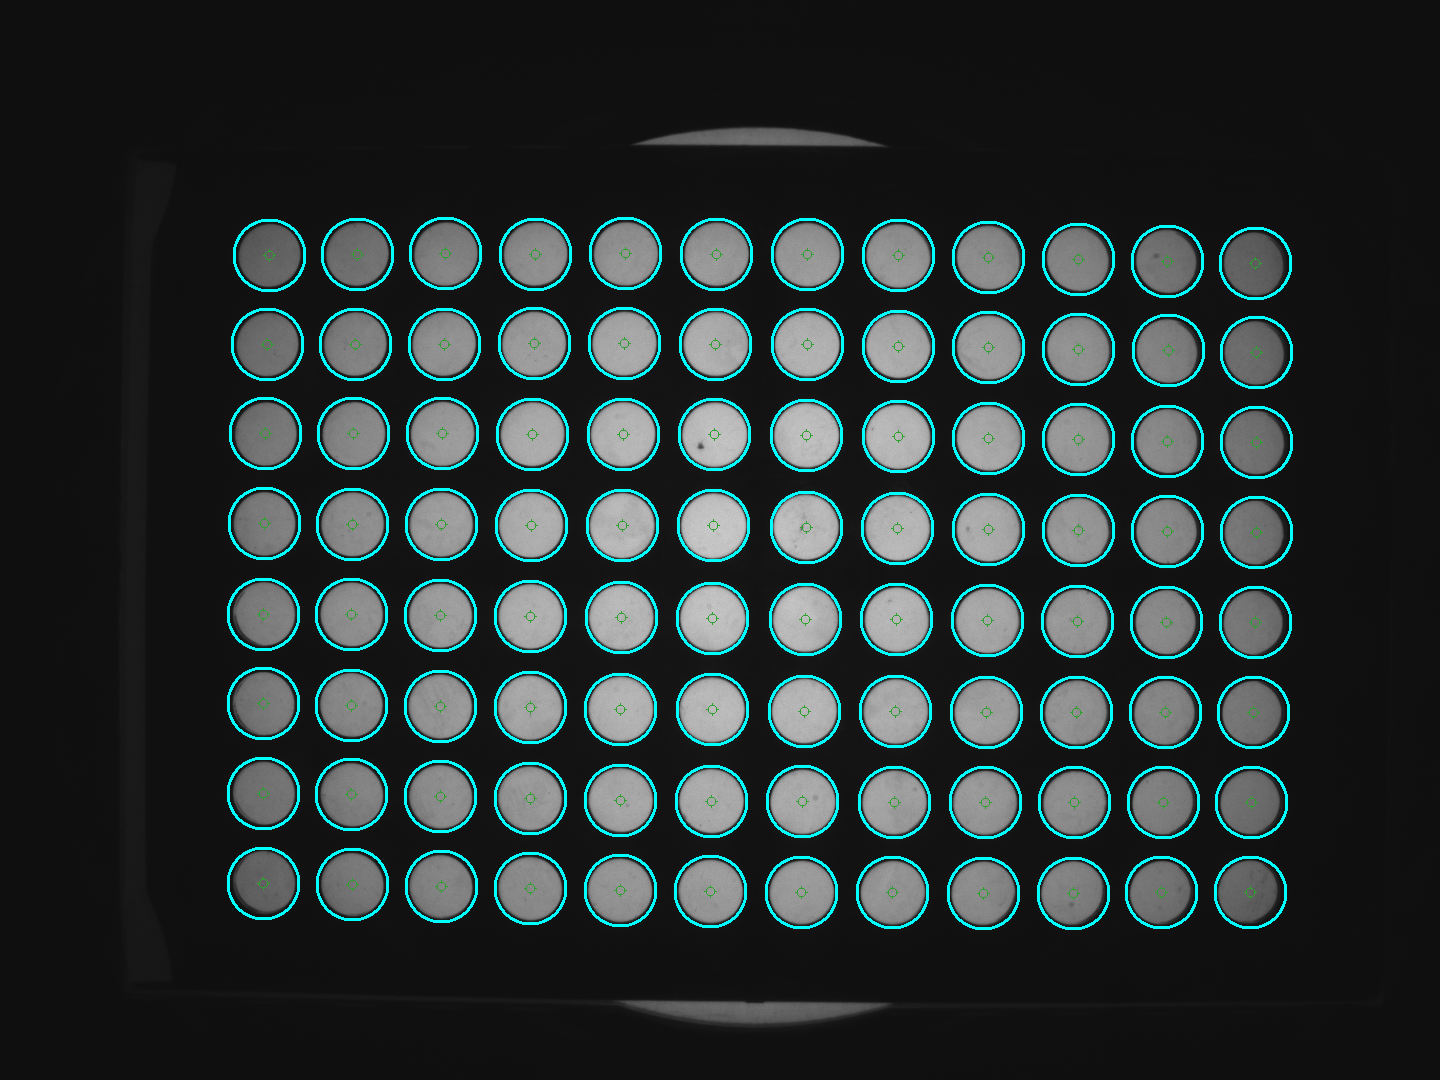
4. Once the calibration is complete there will be new images loaded into the Media directory. Check these images to ensure the calibration was successful. 'calcheck.bmp' is the best way to check the calibration was successful. The light blue circles should completely surround the wells.
Building assets for multi-well plates
Once the calibration is complete, you can download and run the scripts to generate your assets.
1. Download the relevant script below and add this to the Services directory. Instructions on how to upload scripts and add services can be found in Zanscripts & services.
2. Place an empty multi-well plate onto the light stimulation plate and place into the MWP unit. Use the same positioning as with the calibration plate (i.e., pushed to the back and left).
3. While looking at the live video feed, run the script. You will see the arenas generated on the screen and can check the alignment/positioning of the asset with the wells on your plate.
4. Once the script has been run, the asset can be found as a .bmp file in the 'Assets Directory'. The name of the .bmp file that is generated can then be written into experiments for tracking using the LOAD(ARENAS,"name_of_asset") and LOAD(DETECTORS,"name_of_asset") commands.
How to edit arena sizes
The dimensions provided within the scripts will produce the correct number of arenas at the estimated correct positioning. However, the dimensions of multi-well plates may differ between manufacturers. As such, you may need to adjust the dimensions using the following 6 DEFINE directives in the script to match the specifications of the plate you are using.
Example Script
###################################################################
#Geometric definition for 6-well plate
DEFINE X_OFFSET 24.76
DEFINE Y_OFFSET 23.16
DEFINE COL_STEP 39.12
DEFINE ROW_STEP 39.12
DEFINE RADIUS 17.72
DEFINE RADIUS_DZ 12.73
DEFINE X_OFFSET: moves the arenas across the horizontal (x) plane of the image. Increasing this number shifts all arenas to the right and decreasing this number shifts all the arenas to the left.
DEFINE Y_OFFSET: moves the arenas across the vertical (y) plane of the image. Increasing this number shifts all arenas down and decreasing this number shifts all the arenas to the up.
NOTE: These numbers only need to be adjusted minimally to see a difference.
DEFINE COL_STEP: controls the spacing between the wells along the horizontal (x) plane of the image. Increasing this number increases the space between well columns and decreasing this number moves the columns closer together.
DEFINE ROW_STEP: controls the spacing between the wells along the vertical (y) plane of the image. Increasing this number increases the space between well rows and decreasing this number moves the rows closer together.
NOTE: These numbers are typically the same as the spacing across rows and columns on a well plate tend to be uniform.
DEFINE RADIUS: The radius of the well should be consistent with the manufacturer's specifications. You can increase or decrease the size of the arena by adjusting this number.
DEFINE RADIUS_DZ: defines the size of the inner zone in the dual zone asset. It is the size for the 'inner zone'. The calculation for a zone at 50% of the arena's area is =radius/sqrt(2).
Video demo
The video below demonstrates how to run the calibration on the Zantiks console in the MWP unit and build an asset.
Calibrating the MWP unit and building assets
Script downloads
To download the zanscripts to run the calibration and to build assets for a range of multi-well plates as a .zs files (file type Zantiks software reads), choose the Save File As option in the right-click dialogue box. Clicking on the script name hyperlink will open a read-only version of the script.
NOTE: We have noted that Costar® well plates have significantly different positioning of their wells to many other manufacturers and therefore have provided a separate script for Costar® well plate users.
Script downloads:
Calibration: calibration.zs
Arenas for a 6-well plate: g6.zs
Arenas for a 12-well plate: g12.zs
Arenas for a 24-well plate: g24.zs
Arenas for a 24-well Costar® plate: g24costar.zs
Arenas for a 48-well plate: g48.zs
Arenas for a 96-well plate: g96.zs

