The Zantiks Control Console is the home page of the Zantiks unit, where you can operate the unit. From here you can upload and write scripts, load services, run experiments and download data result files and videos.
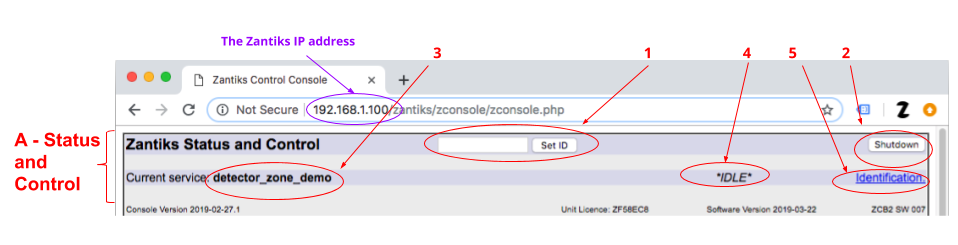
Zantiks Status and Control
The top of the Zantiks Control Console shows the current script/ service/ experiment selected to run (“Current service:”), the status of the experiment *RUNNING* or *IDLE* and Shutdown access.
Zantiks Status and Control
- "Set ID" (A1): Here you can set the subject’s ID (i.e., the identification name or reference given to the individual subject, or group for an experiment).
- Type in the subject ID, (e.g., Fish 1).
- Click the Set ID button.
- The subject ID name will then display in the data output from your experiments.
- “Shutdown” (A2): The unit must be shutdown from this interface before the unit is turned off at the power socket. Units should be shut down each day after use.
- "Current service" (A3): The current service chosen is displayed (i.e., detector_zone_demo). If **None** is shown, no service is selected.
- "IDLE"/"RUNNING" (A4): If the unit is currently running an experiment, *RUNNING* will appear in a pink banner. *IDLE* indicates the experiment is not currently running.
- “Identification” (A5): When operating multiple Zantiks units from the console, the subjects’ IDs for each unit can be added here, as well as the labelling for individual systems.
- Click on Identification button.
- A new screen called ‘Experiment identification’ will open.
- In the ID box, type the subject ID reference.
- The ‘Apparatus’ box will show ‘Zantiks tank’. You can change the name of the tank here.
- Click Set Identification.
- Click on the Home button to return to the Home page.
Services
This middle section of the home page provides access to all the services which are ready to run.
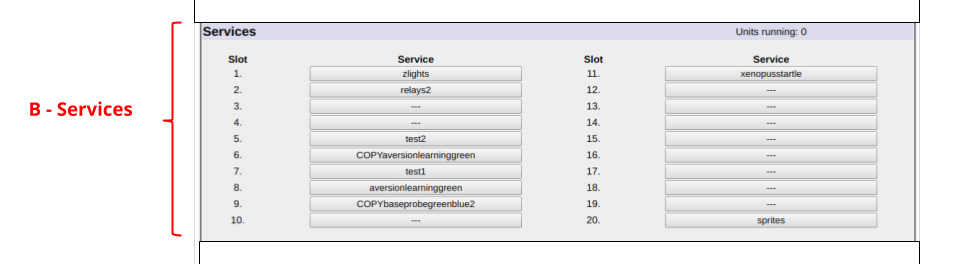
Zantiks Control Console - Services
The Zanscript services are uploaded experiments written on the unit as .zs files using the scripting software Zanscript.
- Slots 1-20 - Twenty services can be loaded here at any one time. To run an experiment, click on the relevant slot which lists the experiment/service’s name. This service will then be detailed after “Current service” (see Figure A , A3).
- A service can be loaded as a 'Service' through the Settings page (#2 in the image below). To familiarise yourself with how to set experiments as "services" see the section Create and load a new service found on the Zanscripts & services page
Administration
At the bottom of the home page is the Administration section. Here you can access all data and directory files held on the unit’s internal storage.

Zantiks Control Console - Administration
- “Disk Space” (C1) - Media: 25436 Mb System: 1065 Mb: This indicates the amount of disk space that is still available on the unit. It is advisable to download the media and data from your experiments and delete old files to free up storage space on the unit as needed.
- NOTE: Regular removal of files is recommended. When less than 500 Mb remains the Disk Space line turns red as a warning.
- "Settings" (C2): This is where experiments are assigned to Slots 1-20 in the Services section.

- Under the heading Zanscript shortcuts you can enter the name of the script that you want to upload in the slot you have chosen. For more detailed instructions visit the Zanscripts & services page.
- Reference Image - this enables you to capture the camera image for use as the background reference. To update the reference image make sure no animals are in the camera's field of view.
- Shutdown - the unit can be shutdown from here or on the home page.
- Restart - this is typically only applicable when you need to restart the unit following a ‘System Update’.
- Configuration settings - this is where certain settings to the camera and computer can be adjusted. See the Configuration settings page for more details.
- System update - this links to the ‘System update’ page. For details see the Software updates page.
- Click Home to return to the Home page.
- "Services directory" (C3): Compiled scripts are saved here as .zex files (i.e., executable Zanscript files). This directory will not need to be accessed, other than when deleting a .zex file from the unit.
- "Assets directory" (C4): Arena settings and reference images are saved here as .bmp files. For example, the AD unit comes preloaded with arenas that match the inserts supplied. A reference image is taken at the beginning of each service to enable accurate tracking of subjects. Only the very latest reference image is ever stored at one time. See Assets section on the Zanscripts & Services page.
- "Media directory" (C5): When a zanscript is programmed to record a video or a take still image during the experiment, it is saved to the Media Directory. In addition, when you click on ‘Capture image’ on the Home page, or on the Live Video page, it captures an instantaneous image of the arena and saves the file in the directory as a .jpg.
- "Data files" (C6): Data from experiments are saved as .csv files and are accessed here. All subjects’ individual data are saved independently into individual files. The system also saves data into a compiled file for all subjects that perform the same experiment on the same day. Data files can be downloaded directly onto any device connected to the unit (e.g., smartphone, PC, Mac).
- "Units Online" (C7): Zantiks units connected to the same network can be quickly accessed from this page.
- “Refresh” (C8): This will refresh the connected device’s screen with any updates if the device is dormant for a while.
- "Capture image" (C9): A still image can be taken from the camera. It will take you to a screen showing the captured image. The image will be stored in the Media Directory (see C5 in Figure C above).
- "Live video" (C10): Live video allows real-time monitoring of the subject and stimuli. This is an ideal page from which to start an experiment. You can check the arena is set up as you expect before clicking 'Run' to start the experiment.
- "Zanscript" (C11): Scripts are written and edited on the Zanscript page. All the current experiments on the system are listed here. The script can be viewed by clicking on the script name's hyperlink and can be edited by clicking on ‘Edit’. (See 'Create and load a new service' section on the Zanscripts & Services page for more details.)
- "Run" (C12): Once the subject ID is set and the service is chosen (the correct ‘Current service’ will display on the Home page), click ‘Run’ to start the service. Ensure the subject is in the unit!
- "Stop" (C13): Clicking ‘Stop’ will terminate the service mid-experiment. This is not a pause.
Next go the manual, Zanscripts & services, to see how to edit and write your scripts on the unit (via your web browser), load them as services and run your experiments.

